Labels

Showing posts with label Being a mom. Show all posts

Thursday, December 13, 2018

DIY Advent Calendar

There are many household stuff lying around that can be re purposed as decorative items.  I for one, believe in buying less.  It also teaches the kids to be more resourceful, creative and to use things responsibly.

Our craft today is to make an advent calendar out of muffin pan and used Christmas decor. 


Things needed are :

Muffin pan
Wrapping papers
Permanent marker
Double sided tape
Old / used Christmas decorative items
Treats


Muffin pan filled with little treats


Decorated with used Christmas decorative items


The end result is quite nice, don't you think?  

Saturday, August 5, 2017

Happy 8th Birthday Princesses!!

Like a blink of the eyes, eight years have passed.  Just like that.

This year, the kids had their friends over for a party and mummy got to bake the cake.  The 2 girls did not request for any particular type of cake so I chose to make a red velvet cake in carousel theme. 

So here are the cake at different setting : home and party venue.


The girls were happy and excited to see the cake.  They were all smiles upon receiving admiration from their friends and parents. As for me, I still can't believe I managed to pull it off.


Sunday, April 16, 2017

Homemade Cream for Eczema

Little X has mild eczema since young. I call it mild as it is not as severe as other cases that I have seen and that it doesnt attack that often. But nevertheless, I can see that the itchiness drives X crazy everytime it flares up.

I have read that a combination of shea butter, coconut  oil and essential oil does help. Since I have the ingredients in hand, there is no harm in whipping some cream for a trial.

So here goes the recipe :

1/2 cup shea butter (~90g)
1/2 cup liquid coconut oil (~90g)
1/4 cup beeswax
20 drops lavendar essential oil
15 drops tea tree essential oil
10 drops rosemary essential oil


Method :

Heat the shea butter and beeswax till melted. Add in coconut oil. Mix well. Let cool. Add in the essential oils. As the mixture cools and thickens, but still liquid, give it a good whip every 5 mins. You can put the mixture in fridge to let it cool faster. Continue whipping every 5mins until soft white peaks are formed and the mixture thickens. Pour into sterilised containers and let set.

The cream is ready to used once it has set.

It is important to note that beeswax is needed when liquid coconut oil is used. If using solid coconut oil, beeswax can be omitted.  The beeswax hardens the cream but be careful to not add too much as it results in a balm that is hard to apply. The amount of beeswax in this recipe is just nice for a soft, and yet not too soft cream.

After using for 2 weeks, I am happy to report that little X did not have any eczema flares at all.


Sunday, March 27, 2016

DIY Christmas Cards

Christmas is long over and only now I have the time to put this up.

Taught the kids to handmade some Christmas cards for sale.  Initially, the idea was just to teach the kids to make greeting cards.  Saw that the outcome was good and thus sparked the idea of making handmade cards for sale. 

It was fun making the cards.  So much fun that we invited the girls' friends over to join in the cards making 'workshop'.  We made a snowman advent calendar too!  All the kids had fun and I was told that some of them sold their cards too. 

All in, we made 60 cards of different designs.  The girls went around shopping malls to sell their wares.  Each card were priced at RM3.  Was told that the selling price was too low.  In actual, they were.  The material cost was already more than that.  But it is ok. Our intention was not to make profit, but to let the kids to learn speaking up, buying / selling as well as change.  

People were generally very responsive and supportive.  Perhaps they just couldn't say no to two cute little girls who timidly approach them.  Some took out their wallets even before the girls reached their tables.  Others were confused when being approached by two girls who looked alike (twins).  All 60 cards were sold in less than an hour.  All money from the sale was donated to Trinity Children Home in Petaling Jaya.   Mommy got to fork out the money for the materials though.  Anyway, it was good that the kids get to do something for the less fortunate even though it was just a small contribution.

We will be doing this again in the years to come.


Sunday, December 27, 2015

Christmas Treasure Hunt


Christmas is almost everyone's favourite holidays.  Although it is hot and humid throughout the year here, Christmas brings with it a 'white' cheer and feel.  I wish that we have a white Christmas here, but having a white Christmas in this part of the world is actually an environment disaster, rather than it being welcomed.


Kids like Christmas because of the gifts that never failed to appear at the foot of the Christmas tree.  This year, we did something different.  Rather than putting the presents under the tree, the kids have to hunt for them through a series of clues.  A Christmas Treasure Hunt.  It sounds exciting!


The kids 'reported' early for the hunt.  Since this is the first time we have such treasure hunt, I made the clues simpler and more straight forward.  Nevertheless, it made the kids ran up and down to search for the next clues.  The kids were excited to finally found their treasures.  Perhaps next year, I'll do a la 'Amazing Race', or make the kids do a bit of chores before we surrender the next clue to them.


Clue Card


Clue Card


Clue Card Peeking from Its Hiding Place


Clue Card Nestled Among the Tree


Found the Clue Card!


The Final Clue


Thursday, April 9, 2015

2015 Cinderella Dress

My girls have been looking forward for the new Cinderella movie with much anticipation. Not really sure if they are looking forward for the Cinderella show itself or the Frozen Fever short film that is aired before the start of the movie.  We enjoyed the Frozen Fever short film very much. Olaf is highly entertaining as usual while the sisterhood between Elsa and Anna is just as great.

The Cinderella movie itself is good but I don't think it is as good as Frozen.  It will take a lot to topple Frozen from the fans' hearts. Perhaps cos we grew up very familiar with the Cinderella story and there is no element of surprise. The storyline is well known and we knew what is going to happen next. Anyway, the animation in the movie is good. I particularly like the castle and Cinderella's house. Really like a page from the fairytale.

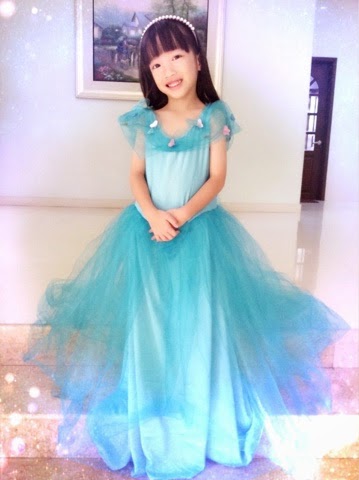
Shortly after watching the movie, I knew what my girls will ask for next, the dress! So here it is.  

I tried to stay true to the dress in the movie as much as I could but of course a little modification is needed here and there to suit children's bodies more.  


The girls were thrilled with the dress and urged me to finish the 2nd one as soon as possible cos they just wouldn't share. But lucky me that since they are twins, the size will be the same and the 2nd dress will be just a duplicate. The patterns are all already in place 😀


Wednesday, February 11, 2015

A Manchu Chinese New Year

Dressing in traditional Chinese costumes during Chinese New Year (CNY) has made a come back in recent years.  Usually parents dressed their little girls in cheongsam or modernised cheongsam.  I myself have sewn a few for my girls in previous.  This year, I decided to make something out of the norm, the Manchu court costumes.

The Manchus is the tribe who ruled China from 1644 to 1912.   The era of their ruling is called the Qing dynasty, the last dynasty in China.  The Qing dynasty was succeeded by the Republic of China

The Manchu court costumes consist of a long robe, which is not as figure hugging as cheongsam.  During cold months, a sleeveless jacket is worn in addition to the long robe.   An elaborate head dress complete the look.  In the Manchu prime era, the head dress is an indication of the rank of the wearer.  Servants wear it very simple and bare.  Higher rank servants may decorate it with some flowers or cheap jewelry.  Women with rank wore very elaborate head dress, decorated heavily with jade and jewelries.  The style of the head dress however, differ from each reign of the Qing emperors.
Empress Cixi of Qing Dynasty

The Manchus, unlike the Han Chinese, did not bind the feet of their women.  The Manchu women wore elevated shoes instead.  Together with the heavy head dress, the Manchu women stood tall and poised.

Elevated shoes of the Manchu Women


I made some modifications to the costume, to cater for the tropical weather that we have here.  The girls look absolutely adorable in their costumes.  The head dress made them look very tall indeed, which was just what the Manchus set to accomplished with the head dress and elevated shoes.


Tuesday, October 28, 2014

DIY Rapunzel Costume

After completing the Flynn Rider's costume, I set to work on the Rapunzel's dress next.  One of my girl will dress up as Rapunzel while my boy will be Flynn Rider this Halloween. 

The Rapunzel's costume consists of a purple dress, complete with the lace at the neckline, puffy sleeves and pink lace in front.  The white lacey petticoat shows from the hem of the dress but instead of wearing a petticoat, I just sewn the lace to the hem.  Attaching the grommets to the bodice was a bit of a challenge though.    After much difficulties,  I managed to finally sourced for the grommets and the tools to attach them in the right size.  I didn't know how to attach them and had to Googled for the instructions.  Didn't know that hammer goes along with dresses!

The dress was done in a day and it is a beautiful one.  I worked on the wig next.  The wig was fairly easy to make.  First, I cut the yarn of desired length, attached them to another piece of yarn and braided them in place.  I attached several flowers to the braids next and it is done!

The girls were delighted with the dress and wig!  I personally feel that the dress is beautiful and it has since become my favourite piece of work.  :)


Monday, October 6, 2014

DIY Princess Anna's Party Gown

The movie 'Frozen' has been released for almost one year and yet, the craze just goes on and on.   Merchandise bearing the pictures and the words 'Frozen' takes form of everything imaginable : clothes, water bottles, eating utensils, bags, pencils, and even, swimwear!

I have sewn a 'mini' Princess Anna's party dress months ago, the green dress that Anna wore when she met Prince Hahn's for the first time. It is also the same dress that she wore to her sister, Queen Elsa's coronation ceremony and ball.  It is a beautiful and elegant gown, adorned with motif at the bodice and thoughout the dress.  And to go with it, a beautiful braided head of hair.

So many moons have passed since I feel like sewing the same dress in bigger size for my 5 years old daughters.  It was done with a little modification : the motif at the dress is sewn on using gauze ribbons, rather than drawn.   The motif at the bodice, however, were drawn using cloth dyes and heat treated. 

It looked doomed to fail at first and I nearly gave up half way. The skirt just wouldn't straightened, probably due to all the tugging and pulling when I sew the ribbons on.  However, after some 'serious' ironing, the gown started to fall in place.  Once the motif at the bodice is drawn, I fell in love with it.

And.. when my girl wore it for the first time, I fell in love with it all over again....

There are many similar 'Princess Anna's dress' out there in the market.  But nothing beats the DIY.


Friday, August 29, 2014

DIY - Transformation of T-Shirts

There is a picture of the kids wearing Frozen costumes which I particularly.  It was a very simple picture taken at the garden of my house.  Then, a friend changed the background and the effect is just... WOW!!


I like the picture a lot and had it printed on T-shirts for the kids.  The T-shirts turned out to be quite large, which looked untidy for the girls. So I sewn a skirt at the hem and turned it into a T-shirt dress.


Original T-Shirt


T-Shirt with skirt attached


Finished dress


The girls wearing the Shirt Dress


The girls wearing the Shirt Dress


Sunday, August 17, 2014

Kids Craft : Felt Bag

A lazy Sunday afternoon is filled with coaching the girls on making a felt bag. 
 
This is the first time they do some sewing and to start with, I felt that it is best to let them handle a blunt needle.  They can work using the usual, sharp needles when they have some experience in sewing and able to handle a needle better later.  The DIY kits were obtained from Mr. DIY for RM2.50 each.  There is a variety of kids crafts available in Mr. DIY for very reasonable prices.  These felt sewing kits is one of them.  Also available are EVA foam crafts in the form of crown, spectacles, pencil holders, etc.  Each of the girls worked on a bag on their own.


DIY Kit from Mr. DIY


Sewing in progress


Sewing in progress


It took some time for the girls to grasp the idea of the kind of stitches that are able to hold 2 pieces together.  Nevertheless, it was a breeze after they have worked it out.  The girls were excited once the bags are done and couldn't wait to show it to their daddy and grandmother.


The finished products

Friday, August 8, 2014

Another Frozen 5th Birthday

Upon request to have all the main characters of Frozen on the cake for the girls' birthday celebration at the kindergarten, I finally came out with a new design. 
 
The cake décor was fairly simple and not as time consuming.  I just had to roll the fondant and put those figurines in place and finished it off with some snowflakes.  The girls were thrilled with the cake.


Upon finishing the cake, I worked on the packing the party packs next.  The party packs consist of set of stationeries, Frozen stamps (chops), jigsaw puzzle and the cookies that I baked earlier, which I packed in separate paper bags.  The paper and party packs were adorned with the girls' pictures in their Elsa and Anna costume.


Party packs


The girls were very excited on the morning of their birthday, reminding me to reach their kindergarten by 10am, which is their recess time.  I brought over the box filled with party packs when I sent them off to school early in the morning and drove to the kindergarten again at 9am, driving very slowly to not damage the cake.  Gosh!  It was so stressful!
 
 
The teachers at the kindergarten have become so used to Frozen themed parties by now but nevertheless, were impressed with the cake.  The children like it too and 'fought' for the tiara and the figurines.  Finally the teacher put the tiara on the elder birthday girl and returned those figurines to me at the end of the day.


The birthday girls with their teacher and classmates


The birthday girls cutting the cake


I used to think that parents spoil kids too much by throwing themed birthday parties for them.  But having gone through it myself now, I understand that seeing the smiles and happiness at their eyes make all the effort worth.