Saturday, August 5, 2017

Happy 8th Birthday Princesses!!

Like a blink of the eyes, eight years have passed.  Just like that.

This year, the kids had their friends over for a party and mummy got to bake the cake.  The 2 girls did not request for any particular type of cake so I chose to make a red velvet cake in carousel theme. 

So here are the cake at different setting : home and party venue.


The girls were happy and excited to see the cake.  They were all smiles upon receiving admiration from their friends and parents. As for me, I still can't believe I managed to pull it off.


Sunday, April 16, 2017

Homemade Cream for Eczema

Little X has mild eczema since young. I call it mild as it is not as severe as other cases that I have seen and that it doesnt attack that often. But nevertheless, I can see that the itchiness drives X crazy everytime it flares up.

I have read that a combination of shea butter, coconut  oil and essential oil does help. Since I have the ingredients in hand, there is no harm in whipping some cream for a trial.

So here goes the recipe :

1/2 cup shea butter (~90g)
1/2 cup liquid coconut oil (~90g)
1/4 cup beeswax
20 drops lavendar essential oil
15 drops tea tree essential oil
10 drops rosemary essential oil


Method :

Heat the shea butter and beeswax till melted. Add in coconut oil. Mix well. Let cool. Add in the essential oils. As the mixture cools and thickens, but still liquid, give it a good whip every 5 mins. You can put the mixture in fridge to let it cool faster. Continue whipping every 5mins until soft white peaks are formed and the mixture thickens. Pour into sterilised containers and let set.

The cream is ready to used once it has set.

It is important to note that beeswax is needed when liquid coconut oil is used. If using solid coconut oil, beeswax can be omitted.  The beeswax hardens the cream but be careful to not add too much as it results in a balm that is hard to apply. The amount of beeswax in this recipe is just nice for a soft, and yet not too soft cream.

After using for 2 weeks, I am happy to report that little X did not have any eczema flares at all.


Saturday, April 1, 2017

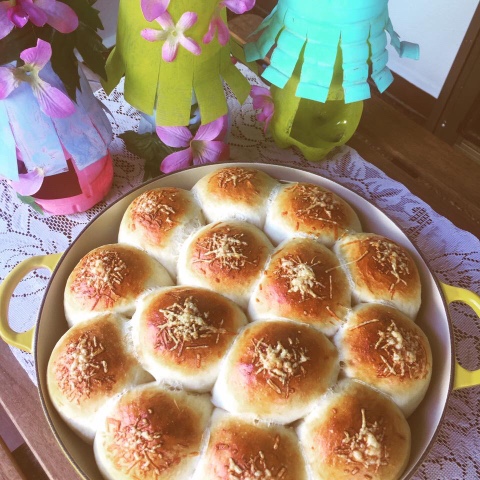
Hokkaido Milk Buns


My children love when I bake.  They love everything that I made for them.

Here is a soft and delicious Hokkaido Milk Bun recipe that I stumbled in the internet. Its fragrance penetrated the whole house and the texture is just oh so soft.  It is a sure winner with my kids.  Every. Time.


Ingredients :

470g bread flour
63g   plain flour
250g low fat milk
200g whipping cream
1 egg
2tbsp milk powder
4tbsp sugar
3tsp yeast
1/2 tsp salt


Instructions:

Mix all ingredients and knead till the dough is no longer sticky.  Let proof for 1 hour.  Divide the dough into balls of 70g each.  Shape into rounds.  Let rest for another 1 hour.

Egg wash and bake in preheated oven at 190 degree Celcius for 20-30 mins.

I have made this several times, tweaking the recipe every now and then.  I would say that the amount of milk and whipping cream can be adjusted as long as the total amount of these two is 450g.  However, I always make it a habit to use less whipping cream as it would be healthier, but then, the choice is yours.

Happy baking!


Saturday, December 17, 2016

Christmas Wreath

It is December. We have got back from a lovely trip to Japan and kids are starting to be bored.  Since it is Christmas soon and we have plenty used cardboards at home, I taught them to make Christmas wreaths out of the cardboard boxes and recycled ornaments.

Truth be told, I got the idea from Pinterest but the result is still stunning.  The kids learnt a lot through the process too.


Wednesday, April 6, 2016

DIY Robot Coin Bank

Today is a day for my little boy.  He must have felt left out with all the girly things that we made all these while.

Recycled a used mouth rinse bottle into a little robot coin bank.  This is a fairly easy craft to do.  

First, cut an opening at the back of a clean and dried bottle to insert the coins.  Then, glue strips of felt,  both at the front and back of the bottle.  Since it is a robot, decorate it with metal stuff such as jump ring, grommet or aluminium foil.

The final product sure put a smile on my little boy's face.  


Saturday, April 2, 2016

Crafts from Used Eggs Carton

Eggs is a must in my house, and I believe, every household.  We buy eggs by the cartons.  Sometimes feel that it is a waste to throw those used cartons away.


There are many uses for the egg cartons actually.  I read somewhere that it can be used to plant small plants or herbs.  We can turn them into crafts too, which was exactly what we did.  We made lobsters, pirate ship as well as little chickens with the used egg cartons.  The cartons were not exactly that easy to paint on due to their 'lumpy' texture but the kids did them alright although far from perfect.  


Little chickens

Pirate Ships


Lobsters

Monday, March 28, 2016

DIY Christmas Door Hanger

Another long overdue post.

The kids have been invited to play at their friends' house quite often during the school holidays.  Good for them to spend time together as much as they can now as they will be attending different schools when school reopens.  There was this one particular evening where I had to pull them back home earlier.  Needless to say, they were disappointed with the 'short' stay at their friend's house. Taught them to make this door hanger in order to 'pacify' them.


Materials needed :

Cardboard (cut into round shape)
Ribbons 
Paper cups
Bells
Yarn / string


I like making things from recycled items.   It teaches the kids to turn waste into something nice / useful as well as saving cost on materials.