Sunday, October 28, 2012

DIY Bolster for Little Ones

Ok, here's a busy mummy's short cut way of making a bolster for little one :


Materials :

1 pc   40 x 20cm    cotton
polyfiber


Steps :


1) Fold the cotton lengthwise with the right side of cotton facing each other.

2) Sew along the length of the cotton leaving behind a gap of about 7cm unsewn.

3) Go through one end of the cotton with a needle and thread and go round it a few times and secure it tightly (as though you are making sweets). Cut of the excess fabric.  Repeat at the other side.

4) Turn the cotton inside out through the gap in (2).  The right side of the cotton is now facing out.

5) Insert polyfiber into the cotton through the gap in (2). 

6) Sew the gap close (either with sewing machine or hand sew).


The bolster is now ready.

This is of course, not the best or correct way of doing but it is the fastest.

Happy sewing!!


Wednesday, October 24, 2012

Hobbes - A Tutorial

Promised some mummies to  post a tutorial on how to sew the 2 in 1 (toy + blanket) Hobbes.  Took me quite a while to complete this as I have been bitten by the lazy bug lately. Anyway, here it is.  Happy sewing!


Materials :

Orange fleece  (1.5m)
Black fleece (0.5m)
White cotton ( 0.5m)
Pink fleece (0.2m)
Polyfiber
9 inches zip
2 buttons


Patterns :

(Sorry for the blur image.  Will post a better one later)


Steps :


Limbs

1) Place a piece of white cotton and a black strip with the right sides together.  Sew one of the edge.  Open up and lay flat so that the right side of the cloth is facing up.

2) Place a piece of orange strip on the black strip of (1) with the right sides together.  Sew along the edge. Repeat with alternate orange and black strips till there are altogether 2 orange stripes and 2 black stripes. 

3) Fold the piece of cloth obtained in step (2) to half lengthwise with the right side together.  Sew along the open edge with the exception of the end of the orange stripe.  (Note : Sew the corner of the white slightly rounded)


4) Turn (3) inside out.  Insert some polyfiber into it and leave aside. 


5) Repeat steps 1 - 4 for the remaining 3 limbs.


Tail

1) Repeat step  1 - 3 of the limbs for the tail with the exception to use only black and orange strips.  There should be 3 black stripes and 3 orange stripes now.  Polyfiber is not needed for the tail.


Body

1) Arrange and pin the black stripes in place on the front body piece as shown in picture.

2) Attach the G foot to the sewing machine and select stitch no. 10 (for Brother NV50).  Sew all the black stripes in place with black thread.

3) Arrange and pin the white cotton for tummy in place on the front body piece.  Sew using the same stitch  with white thread.


4) Repeat step no. (2) for the back body pieces, be careful to arrange the black stripes so that they form a continuous stripe with the front body piece.

5) Lay the front body piece flat with the right side facing up.  Arrange the limbs on top.  Then with the right side of the cloth facing down, place the back body pieces on them and pin in place.


6)  Sew along the 2 sides of the body (with the limbs attached) with straight stitch.  (You may want to reinforce the stitches at the limbs by sewing forth and back a few times).

7)  With the body wrong side out, pin the oval orange fleece to the bottom.  Sew in place.


Ears

1) Place 2 pieces of black fleece together with right sides facing each other.  Sew along the perimeter (slightly rounded at the corners) with the exception of the lower side.

2) Turn the ear piece inside out.

3) Fold one end of the ear piece into half and sew a few stitches to hold the shape.

4) Repeat steps 1 - 3 for the other ear piece.


Head


1) Sew the open ends of the muzzle piece together as shown in picture.


2) Sew the open ends of the head pieces together.  

3) With the right side facing up, pin the muzzle onto the lower centre of one of the head piece while inserting the gap in between with polyfiber to make the muzzle fluffy.   Sew in place with stitch no. 10 once you are happy with the shape and position of the muzzle.

4) With the right sides facing each other, stack the 2 head pieces together and sew along the perimeter.
(Note :  You may arrange the ears in place and sew them together with the head piece.  I prefer to sew the head pieces together and the open a little of the seams later to insert the ears as this allows me to get a better picture on the position of the ears)


5) Hand sew the eyes, nose and mouth as well as the stripes at the head (2 stripes each at the top, left and right).


Assembling all the Pieces


1)  Turn the body piece inside out so that the wrong side is facing out.

2)   Place the head down into the hollow of the body.  Pin the head and the body together to form a neck.  Sew in place with straight stitch.


Head in the hollow of the body


3) Turning the body out, the doll is now almost completed.

4)  Fill the head with polyfiber through the opening at the neck.  Close the opening by sewing a piece of oval orange fleece onto it.


5)  Attach the tail to the rear of the doll and sew in place.  (Be careful to sew at the inside of the body so as not to let the stitches show at the outside).

6)  Attach a zipper foot to the sewing machine and sew the zip in place at the back of the body.


7)  Sew a button each at the top and end of the zip.

8)  Sew buttonholes at the side of a piece of 1m orange fleece to coincide with the 2 buttons at the back of Hobbes and rip the holes with a seam ripper. 
(Note : Button hole no. 45 for Brother NV50).

9) Tie the pink fleece to the neck as a scarf.


The toy + blanket Hobbes is now done!


The 1m orange fleece serves as the stuffing and taken out when needed to be used as blanket.  When used as blanket, attach the buttons at the back of Hobbes to the buttonholes at the blanket.  This will hold the doll in place and will prevent it from being lost or misplaced.


Friday, October 12, 2012

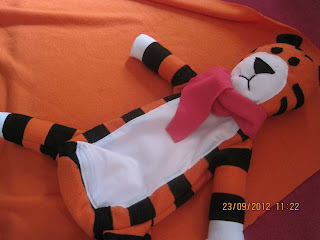
Hobbes for My Little Boy

Fans of Calvin and Hobbes goes by the saying 'every little boy should have a Hobbes'.  So does mine.  Unfortunately, neither Calvin nor Hobbes are available as a toy.  This is because Bill Waterson, the author, did not want to have these characters commercialised and thus would not licensed them out.  So, the only way to get hold of a Hobbes is to diy.

Made a Hobbes from scratch for my little boy, Ray.  It is a 2 in 1, toy as well as blanket.  Sourced the fleece from Kamdar, Mid Valley.

I was full of excitement when sewing it.  The most tedious part was sewing the stripes as I sewn it using the edge finishing stitch, which took like forever.  Time went by and it seemed like I was not going anywhere.  However, once the stripes were in place, the rest were a breeze as they were sewn using normal straight stitch.

The doll was completed in just 1 afternoon.  The Hobbes is taller than my boy!  The back opens up with a zip to reveal the blanket. 


Hobbes for my little boy


Zip at back revealed the blanket


Hobbes as Blanket


Hobbes as Blanket


Ray loves it or to be more precise, loves biting it.  It must be the striking combition of orange and black color that attracted him so.  This Hobbes would be a perfect companion for him.  The chinese believes that tigers could protect little ones from evil spirits.  That is why chinese kids have many clothings adorned with tigers; i.e. hat, shoes, vests, etc.  Hobbes may be gentle, but he is still a tiger. Thus I believe he will protect my boy.  Having said that, I am not a superstitious person. 

A doll wearing chinese tiger hat

Chinese Tiger Shoes


Thursday, October 11, 2012

Pumping Milk Across the Continents

Travelling is always fun and exciting, what more when you get to travel to places that you have been wanting to set your foot to since ages ago.  This was exactly how I felt when I get the opportunity to go on a 2 weeks trip to Europe; London, Brussels and Paris to be exact. Travelling this time is a bit different from usual, as I am still breastfeeding my 10 months old baby boy, Ray. 

Expressing breast milk on the go is not new to me. I had been on a 10 days trip to US in 2010, when I was still breastfeeding my twins.  The experience then were shared in my page here : Travelling with Expressed Breast Milk.  I did not expect any difference this time. Armed with an 8.5L 26.4 L Coleman ice storage box, 2 techni ice sheets, 2 packs industrial strength dried ice, a cool storage bag, breast milk storage bags and my Avent manual pump, I boarded the plane and off I went to London.

The Coleman ice box was checked in along with the industrial dried ice while I carried the cool storage bag, techni ice sheets, some milk storage bags and my pump with me. Since it was a 12 hours + flight, I calculated that I will need to pump at least twice during the journey.  To avoid creating inconvenience to other fellow passengers, I pumped in the toilet when meals was served. Since everyone else was eating, no one bothered that I occupied the toilet for a long time.  The second pumping was done at least 3 hours before the estimated arrival time. Everyone was still sleeping at that time and I get to use the toilet as long as I like.  The 3 hours before arrival was chosen as meals was once again served 2 hours before arrival. 

Once finished pumping, I stored the ebm in the milk storage bag and sealed it well.  Upon passing it to the stewardess to be put in the freezer, I was told that they are not allowed to keep passengers' food. This is indeed a change of policy as I used to kept my ebm in the plane's freezer during my US trip 2 years ago. I was at a loss of what to do as the techni ice sheets will not last for the 12 hours flight, plus the time needed to get to the hotel upon arrival. A kind steward then offered to keep the ice sheets in the freezer (this is allowed since it is not food) and gave me a bag of ice to keep my ebm cooled in the cooler bag. This was the best available option. It kept my ebm cooled although I had to keep replenishing the ice every now and then.

Upon reaching the hotel in London, I immediately passed all the ebm as well as the dried ice and techni ice sheets to the hotel’s staff to be kept in their restaurant’s freezer, after labeling them with my name and my room’s number.  For the entire three days I stayed in the hotel, I did the same, that was, passing the ebm to the hotel’s staff to be kept in the freezer along with the rest.  When the time come for me to leave London for Brussels, I ‘redeemed’ all the ebm half an hour before the taxi that was supposed to bring us to the train station arrived.  All the ebm and the ice were kept in the coleman and strapped with a luggage strap.

The journey from London to Brussels by the Eurostar took only 2.5 hours.  Upon reaching the hotel in Brussels, I did the same as in London.  This went on till I arrived in Paris 6 days later.  Upon passing my ebm to the hotel’s staff in Paris, I was told that the hotel does not have a freezer.  I was shocked as I already e-mailed the hotel weeks and a day before arrival that I will need to put something in the freezer and the hotel replied that they will gladly comply to my request.  After some reasoning with the staff, finally they agreed to take the ebm off my hand and a freezer magically appeared (since they mentioned earlier that they do not have one).  I have anticipated some problems in Paris as I do not speak French and this is rather an unusual request.  Already thought about this and asked a friend who is currently residing in France to help me translate the phrase ‘human breast milk’ and ‘I am a breastfeeding mother.  Can I put my ebm in your freezer?’ in French.  This however, was not necessary as the hotel’s staff speak good English.  However, I feel that having the phrase or sentence in local language will help in places where English is not commonly spoken.

After being on the go for 15 days, I was worried that the coleman will not be able to fit in all the ebm.  Although hb and I agreed earlier that we will buy an extra ice storage box if need be, I felt that it was too expensive to do so and decided to discard some if necessary.  On the day of departure, I requested the ebm and ice packs from the hotel’s staff half an hour before checking out.  All the ebm needed some ‘clever’ arranging to fit into the Coleman.  Sure enough, the Coleman couldn’t accommodate all and I had to take out one of the industrial strength dried ice so that all the ebm can go into the coleman.  I then carried the ice pack in my cooler bag along with my pump for pumping in the plane.  The Coleman was then strapped with the luggage strap and labeled with the phrase ‘Lait Maternel’ meaning human breast milk.

What we didn’t take into consideration was the weight of the ebm and we exceeded 8kg of the baggage allowance.  The coleman with all the ebm weighed 18kg in total and we had to pay 500 Euro for the excess weight.  That was RM2000!  The lady at the check in counter advised that we hand carry some heavy stuff to meet the baggage allowance so that we will not have to pay so much.  Hb and I ended up with very heavy hand luggage but at least we did not have to pay for exceeding the check in baggage allowance.  The Coleman was treated as oversized luggage as it is fragile and needed to be handle with care.

During the flight, once again, I pumped twice during the entire journey.  A kind and understanding stewardess directed me to a larger toilet for more comfort.  She mentioned that I can use their praying area, which is covered by curtains for pumping if I want but also advised that the toilet will offer more privacy.

The flight from Paris to KL took almost 12 hours.  All in, from the time we departed the hotel to the time we reached home, it was about 18 hours in total.  After 18 hours, all the ebm was still rock frozen although I have removed one of the industrial strength ice packs earlier.  I guess the frozen ebm also helped in sustaining the coolness in the Coleman.


To sum up everything :

Before the journey :

1) Estimate how much ebm there be and bring along an ice storage box of appropriate size and sufficient amount of milk storage bags (bottles).
2) Pack luggage with the weight of ebm in mind
3) Contact the hotel to ensure they have a freezer and is willing to have the ebm kept there
4) Pack a pump and ice sheets in a cooler bag to be carried on board for pumping during the flight
5) Prepare resquest to put ebm in hotel's freezer in local language

During the flight :
1) Express milk when everyone is eating or sleeping
2) Ask the steward / stewardess for some ice and put the ice sheet in the plane's fridge (if it is a long flight)

The journey home :
1) Line ice storage box with dried ice before putting in the frozen ebm.
2) Cover the top with towel.
3) Label the ice storage box with the phrase 'human breast milk' in English and local language
4) Strap the ice storage box (to prevent accidental opening)